
How to Replace the Cylinder Head on a 150cc Scooter
Share
Introduction
If your 150cc scooter is experiencing issues with the cylinder head, such as damage or reduced performance, it may be necessary to replace it. In this guide, we will walk you through the process of replacing the cylinder head on a 150cc scooter. Replacing the cylinder head is a relatively advanced task that requires attention to detail and the right tools. Below, we provide a detailed step-by-step guide to help you successfully complete this repair.
What You'll Need
Before getting started, gather the necessary tools and parts:
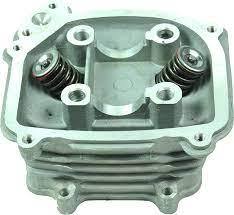
- Replacement 150cc Cylinder Head: The specific cylinder head suitable for Tao Motor ATA150G, Bull150, 4FUN150, Arrow150, and Targa150 models is crucial for this repair.
- Socket Set: To remove and secure bolts during the process.
- Torque Wrench: For precise tightening of bolts to the manufacturer's specifications.
- Gasket Sealant: To ensure a proper seal between the cylinder head and the engine block.
- Shop Towels: For keeping the work area clean and wiping away any excess sealant.
Step 1: Preparation
Park your scooter in a well-lit and ventilated area. Allow the engine to cool down completely before proceeding. It's important to start with a cool engine to avoid burns and to get accurate torque readings during reassembly. Gather all the necessary tools and the replacement 150cc cylinder head.
Step 2: Accessing the Cylinder Head
Locate the cylinder head on your scooter's engine. Depending on the model, you may need to remove the fairings or other components to access the cylinder head. Refer to your scooter's manual for specific instructions regarding the disassembly of components.
Step 3: Removal
Use the socket set to carefully remove the bolts securing the cylinder head in place. It's essential to keep track of the bolts and any associated components. You may need to refer to your scooter's manual to identify the specific bolts and their locations.
Step 4: Replace and Seal
Carefully remove the old cylinder head, taking care to not damage the mating surfaces on the engine block. Clean the engine block surface thoroughly and place the new 150cc cylinder head in position. Apply gasket sealant as needed and securely fasten the bolts using the torque wrench. Follow the torque specifications in your scooter's manual to ensure proper tightness of the bolts.
Step 5: Reassembly
Reassemble any components or fairings that were removed to access the cylinder head. Ensure all parts are properly aligned and secured. Take your time during reassembly to avoid pinching wires or hoses, and refer to your scooter's manual for specific instructions regarding the reassembly of components.
Step 6: Test Run
Start the scooter and allow it to run for a few minutes. Check for any signs of leaks or abnormal sounds, and verify that the cylinder head is functioning properly. Recheck all the fasteners after the initial test run and during subsequent rides to ensure everything remains properly secured.
Additional Tips
Here are some additional tips to keep in mind while replacing the cylinder head:
- Take pictures or make notes during disassembly to help with reassembly.
- Use a proper container to store the removed bolts and small parts to prevent their loss.
- Inspect other related components, such as the gasket and valves, while the cylinder head is removed.
- If you're unsure about any step, refer to your scooter's manual or consult with a qualified mechanic.
Conclusion
Replacing the cylinder head on a 150cc scooter is a task that requires precision and attention to detail. By following these steps and using the suitable replacement parts, such as the 150cc Cylinder Head suitable for Tao Motor ATA150G, Bull150, 4FUN150, Arrow150, and Targa150 models, you can ensure the continued performance and reliability of your scooter's engine. Remember to take your time, consult the manual, and seek professional assistance if needed to ensure the job is done correctly and safely.