
How to Replace the Headlight on a Tao Motor ATV
Share
Tao Motor ATV - Headlight replacement
When it comes to ensuring your safety while riding your Tao Motor ATV, having fully functional headlights is crucial. If you've noticed that the headlight is dim or not working, it may be time to replace the headlight bulb. In this comprehensive guide, we'll take you through the step-by-step process of replacing the headlight on a Tao Motor ATV.
Step 1: Gather Your Tools
Before starting the replacement process, make sure you have the necessary tools at hand. You may need a screwdriver, pliers, gloves, and a cleaning cloth for safety and cleanliness.
Step 2: Locate the Headlight Assembly
Identify the headlight assembly on your Tao Motor ATV. It is usually situated at the front of the vehicle and is protected by a clear plastic cover. Different ATV models may have varying designs, so refer to your vehicle's manual for specific instructions.
Step 3: Access the Bulb
Depending on the ATV model, you may need to remove the plastic cover or access panel to reach the headlight bulb. Carefully detach any screws or fasteners holding the cover in place and set them aside. Take your time to avoid damaging any components during this process. If you're unsure about the removal steps, consult the manufacturer's manual or seek professional assistance.
Step 4: Replace the Bulb
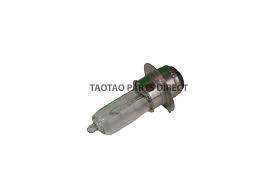
With the headlight assembly exposed, locate the old #4 Headlight Bulb. This 12v18/18w Headlight Bulb is compatible with ATA-110-H and ATA-125-H, delivering reliable performance. When handling the new bulb, ensure that you avoid touching the glass part with your fingers, as this can affect its longevity and performance. Use gloves or a clean cloth to handle the bulb. Take note of how the old bulb is connected and fitted, as you will need to replicate this when installing the new bulb. Carefully insert the new bulb, ensuring a secure fit to guarantee optimal functionality.
Step 5: Reassemble and Test
Once the new bulb is securely in place, reattach the plastic cover or access panel. Carefully fasten any screws or fasteners to ensure the cover is fitted snugly, preventing any moisture or debris from entering. After reassembly, take a moment to test the headlight to confirm that it is working properly. This test ensures that the replacement was successful and that you can rely on your ATV's headlight for clear visibility during rides.
Tips and Considerations
Here are some additional tips and considerations to keep in mind when replacing the headlight on your Tao Motor ATV:
- Refer to the ATV's manual: If you encounter any difficulties or are unsure about any steps, consult the manufacturer's manual for your specific ATV model. The manual can provide valuable insights and guidance tailored to your vehicle, ensuring a smooth headlight replacement process.
- Inspect other components: While you have the headlight assembly open, take the opportunity to inspect other relevant components for any signs of wear or damage. This proactive approach can help you address potential issues before they escalate, contributing to the overall maintenance of your ATV.
- Regular maintenance: Periodically check the condition of your ATV's headlights and perform routine maintenance to ensure they function optimally. This can involve cleaning the headlights, checking electrical connections, and replacing bulbs as needed. By incorporating regular maintenance into your ATV care routine, you can enhance the longevity and performance of your vehicle's headlights.
Conclusion
By following these detailed steps, tips, and considerations, you can confidently replace the headlight on your Tao Motor ATV using the #4 Headlight Bulb. This essential maintenance task ensures that you have reliable and effective headlights for safe and enjoyable riding experiences. Remember, proper lighting not only enhances your visibility but also promotes overall safety for both you and others on the road. If you encounter any difficulties or are unsure about any step, consult a professional mechanic or refer to the ATV's manual for guidance.