Replacing the Hydraulic Rear Brake System on a 125cc ATV
Enhance Your ATV's Performance: A Comprehensive Guide to Replacing the Hydraulic Rear Brake System on a 125cc ATV

As an avid ATV rider, you understand the importance of maintaining your vehicle's critical components for optimal performance and safety. One such essential part that often requires attention is the hydraulic rear brake system. Over time, continuous use and exposure to various riding conditions can lead to wear and tear, necessitating the replacement of the rear brake system on your 125cc ATV.
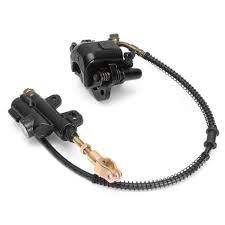
Introducing the 110/125cc Rear Brake
Designed specifically for Tao Motor B110, D125, NewTFORCE, and NewCheetah models, the 110/125cc Rear Brake offers ATV enthusiasts a reliable and compatible replacement option for their hydraulic rear brake system. Engineered to meet the highest standards of quality and performance, this rear brake system ensures a seamless installation process and consistent braking efficiency.
The 110/125cc Rear Brake boasts several key features that make it a preferred choice among ATV owners:
- Compatibility with Tao Motor B110, D125, NewTFORCE, and NewCheetah models
- Durable construction for longevity and reliability
- Precise engineering for optimal braking performance in various terrains
- Easy installation process for DIY enthusiasts and professional mechanics alike
Installation Guide for the 110/125cc Rear Brake
If you're considering replacing the hydraulic rear brake system on your 125cc ATV with the 110/125cc Rear Brake, follow these simple steps for a successful installation:
- Start by securely placing your ATV on a level surface and lifting the rear wheel to access the brake system.
- Locate the current rear brake assembly and carefully remove the caliper by loosening the mounting bolts.
- Disconnect the brake line from the caliper and extract the old brake pads, taking note of their orientation.
- Install the new 110/125cc Rear Brake pads into the caliper, ensuring a proper fit and alignment.
- Reconnect the brake line to the caliper and securely fasten all bolts to complete the installation.
- Test the new rear brake system by gradually applying the brake lever and confirming smooth operation.
By following this step-by-step guide, you can enhance your ATV's braking performance and safety with the 110/125cc Rear Brake, designed to deliver consistent and reliable stopping power on all your off-road adventures.
Don't wait until your ATV's braking system shows signs of deterioration. Upgrade to the 110/125cc Rear Brake today and ride with confidence knowing your vehicle is equipped with quality and dependable braking components.