Replacing the Rear Axle Carrier on a Tao Motor ATV
A Comprehensive Guide to Replacing the Rear Axle Carrier on a Tao Motor 110 & 125 ATV
As an owner of a Tao Motor 110cc or 125cc ATV, it's essential to understand the process of replacing the rear axle carrier, a critical component for the proper functioning and safety of your vehicle. This comprehensive guide provides detailed steps and insights into the replacement procedure, ensuring a smooth and informed maintenance experience.
Understanding the Rear Axle Carrier
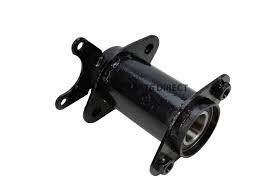
The Rear Axle Carrier is a precise component engineered for Tao Motor 110cc/125cc ATVs. Specifically designed to accommodate a 6006 bearing size and a 35 55 8 seal, it exemplifies compatibility and reliability for the designated ATV models. Its role in supporting the rear axle and wheels underscores its significance in maintaining optimal performance and safety.
Indications for Replacement
Over time and extended usage, the rear axle carrier is susceptible to wear and tear, potentially leading to performance degradation and safety concerns. Owners should regularly inspect this component for any signs of damage or deterioration, promptly replacing it when necessary to ensure the continued reliability of their ATV.
Preparation and Safety Measures
Prior to initiating the replacement process, it is crucial to gather the required tools and equipment. These may include a jack, jack stands, wrenches, sockets, and a torque wrench. Additionally, safety precautions such as using appropriate personal protective equipment and creating a well-lit and adequately ventilated workspace are imperative for a safe and efficient procedure.
Step-by-Step Replacement Process
- Commence by lifting the ATV and securely placing it on jack stands to establish a stable and safe working environment. Remove the rear wheels to gain access to the rear axle carrier.
- Procede to detach the axle nut and carefully slide out the rear axle, ensuring meticulous attention to the placement of washers and spacers for seamless reassembly.
- Proceed to unbolt the old rear axle carrier from the ATV frame and perform its careful removal, exercising caution to avoid damage to surrounding components.
- Thoroughly inspect the axle housing and surrounding components for any indications of damage or excessive wear. Ensure that the area is meticulously cleaned before the installation of the new rear axle carrier.
- Install the new 110/125cc Rear Axle Carrier into position on the ATV frame, securing it firmly with the appropriate bolts and ensuring a precise fit with the designated components.
- Slide the rear axle back in, meticulously placing the washers and spacers in their correct position, and proceed to securely tighten the axle nut.
- With the new carrier in place, reinstall the rear wheels and proceed to lower the ATV back to the ground, preparing it for subsequent use.
Post-Replacement Considerations
Upon completing the replacement process, it is essential to conduct a comprehensive inspection of the entire rear axle assembly. This step ensures the secure installation and functioning of the new carrier, providing peace of mind regarding the safety and performance of the ATV. Additionally, a brief test ride in a controlled environment is advisable to confirm the effective operation of the rear axle and the replaced carrier.
Conclusion
By diligently following the detailed steps provided in this guide, you can successfully replace the rear axle carrier on your Tao Motor 110cc or 125cc ATV, contributing to the safety and longevity of your vehicle. Regular maintenance, timely replacements, and adherence to manufacturer's guidelines are instrumental in ensuring the optimal performance and reliability of your ATV. Explore the 110/125cc Rear Axle Carrier to secure a high-quality replacement part, specifically designed for your ATV. It's time to ride with confidence and peace of mind!
