
Replacing the Front Brake Assembly on a RPS Hawk 250 Motorcycle
Introduction to Front Brake Assembly Replacement
As a dedicated motorcycle enthusiast, you understand the importance of maintaining your RPS Hawk 250 in peak condition. The front brake assembly is a critical component that requires periodic inspection and replacement to ensure your safety on the road. In this comprehensive guide, we will take you through the intricate process of expertly replacing the front brake assembly on your Hawk 250.
Step 1: Preparing for the Replacement
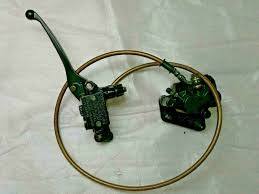
Begin by gathering the essential tools and equipment required for the task. Ensure you have the RPS Hawk 250 motorcycle front Front Brake Assembly, which includes a high-quality caliper, brake line, cylinder, and lever.
Step 2: Detailed Removal of the Old Front Brake Assembly
Secure your motorcycle on a stable surface, and carefully remove the brake fluid reservoir cap. Loosen the bolts securing the old brake assembly and gently detach the brake line and cylinder from the caliper. Take note of the positioning and orientation of each component for the smooth installation of the new assembly.
Step 3: Precision Installation of the Hawk250 Front Brake Assembly
With the old assembly removed, meticulously install the new Hawk250 Front Brake Assembly. Attach the caliper, brake line, and cylinder to their respective positions with precision. Double-check the alignment and fastening of each component before proceeding.
Step 4: Methodical Bleeding of the Brakes
Bleeding the brakes is a critical step to eliminate any air pockets that may compromise the braking system. Use a clear hose to connect to the bleeder valve and a container to collect the old brake fluid. Squeeze the brake lever while opening the bleeder valve to release any trapped air. Repeat this process until you observe a consistent flow of clear brake fluid.
Step 5: Thorough Testing and Adjustment of the Front Brakes
After bleeding the brakes, conduct thorough testing of the front brakes. Squeeze the brake lever and assess the responsiveness and smoothness of the braking action. Make necessary adjustments to the lever tension and caliper alignment to achieve optimal braking performance.
Step 6: Final Checks and Safety Measures
Conduct a final inspection of all connections and bolts to ensure they are securely fastened. Reinstall the brake fluid reservoir cap and test the brake lever for any irregularities. Take your motorcycle for a brief test ride in a safe environment to evaluate the effectiveness of the new front brake assembly.
Conclusion: Mastering Front Brake Assembly Replacement
By mastering the art of replacing the front brake assembly on your RPS Hawk 250 Motorcycle with the Hawk250 Front Brake Assembly kit, you are investing in your safety and riding experience. Remember, regular maintenance and proactive replacement of components are keys to a reliable and enjoyable ride. Ride on with confidence!
